


Crossfire Ranch Supply
Z Tag Applicator
Pickup available at 20098 US-16
Usually ready in 1 hour
Benefits
- Easy application
- Superior retention
- No buttons required
- Locks closed for easy fit into pockets
- Durable glass-filled nylon construction
- Comes with a spare applicator pin, which is in the bottom handle of the tagger
- The applicator has a hardened tip that makes a small incision, slides through and then instantly slips off the unique flip-out pin as the ear pulls back.
Specs
- 10-1/2" long
- Plastic
- Installs one-piece Z Tags: Long Neck Calf, One Piece Calf and One Piece Cow
Tips
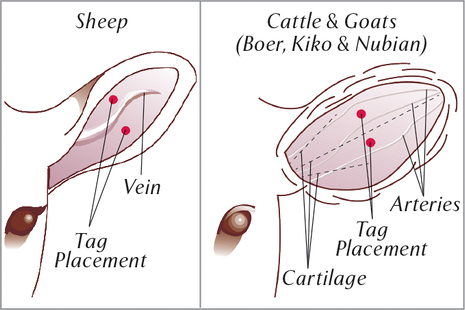
Tag placement is critical to success!
For maximum retention and the lowest risk of bleeding and infection, place ear tags in either of the two spots shown in the illustration below. The goal is about 2-3 inches from the head of the animal.
TIP: Inserting Tags in Cold Weather
Plastic tags (all brands) are much easier to install if they are warm. Why? As the temperature drops below freezing, plastic becomes less flexible (more stiff). Forcing the male point of a tag through the female takes many more lbs. of pressure (because the female must expand).
So if you care about your hands it’s a good idea to keep the tags above freezing in very cold weather. It takes very little to do this. One method is to simply store them while tagging in a small bucket, cardboard box or tool box with a lid alongside a sealed pop bottle full of warm water. The warm water will keep both the air and the tags warmer in the container.
How to Use
- Flip applicator pin up to tag loading position.
- Insert pin into tag.
- Straighten self piercing tip and push down onto pin. Make sure tag is fully seated on the pin before tagging.
- Rotate tag to the side. Flip the applicator pin down into tagging position.
- Tag through the front of the ear only. To apply tag, squeeze handles firmly together and hold closed.
- To remove applicator, pull the Z Tags applicator straight down and away from the ear on one single motion. Do not release the applicator handles at any point during step.
- When the Z Tags applicator is pulled away from the ear, the pin automatically flips up to eliminate ripped ears and damage to the pin.
Instructions also included with packaging. There is a spare pin located in the bottom of the handle. Use a light lubricant on the applicator and pin to increase workability and guarantee long life. When writing your own numbers with the Z Tags marking pen, be sure to apply two good coats of ink to allow maximum penetration into the tag panel. This process will guarantee longer lasting numbers.
Precautions
Tag has a sharp point, please exercise caution.
For animals with soft ears: young calves; it is important to grasp the tip of the ear with a free hand and hold the ear taut to add support and ensure complete penetration of the tag tip through the ear.
Does not insert two piece tags.
 Z Tag Applicator
$36.99
/
Z Tag Applicator
$36.99
/
